MANUS Core 2.1 | DevTools | Skeleton Retargeting Tool
Note: This article applies to both Prime 3 Haptic XR Gloves and Prime 3 Mocap Gloves
Note: This article applies to both Quantum Mocap Metagloves and Quantum XR Metagloves.
Introduction
Dev Tools is our solution to seamlessly help you prepare your models for use with our animator and retargeter. Models can be sent to the tool from our SDK, Unreal and Unity plugins. Here you will define the skeleton by labelling the bones. When you are done you either send the skeleton definition back to the plugin or you can export it as an .mskl file and import it into your applications manually.
Connection
When the user opens MANUS Dev Tools, it will automatically try to connect to MANUS Core. If autoconnection is not successful, the Core Selector Panel will popup letting you pick which MANUS Core instance you want to connect to manually.

After a successful connection the Connection button will be highlighted with a green color.

Loading a Skeleton
Loading a Model If you have already sent a model to the tool from one of our plugins, MANUS Dev Tools will automatically attempt to load it.
The user can also click the button “Available Models” to load or reload a new skeleton.

The user can also click the button “Available Models” to load a new or previously used model.

A popup panel will show up with the list of sessions and models available to be loaded.
You can then either select a model or click “Open Model” to load a previously saved .mskl file from your file system.


Views
MANUS Dev Tools allows you to freely control the camera or snap to predefined positions. The user can switch between orthographic and perspective cameras (using the 2d and 3d buttons).


Hierarchy Panel
The Hierarchy panel shows the models' hierarchy. Every node can be selected, collapsed/expanded, or hidden/shown in the viewport.
On the bottom the current selection is shown with it's subsequent type and id.
There is also a search box to quickly traverse the hierarchy.

Every selected node is also highlighted on the skeleton in the main view.
The visibility of each node can be toggled and hide undesired nodes in the skeleton.

The Hierarchy panel also offers a filter that the user can use to focus on only parts of the skeleton.

Node Selection
Selecting nodes can be done by clicking on node in the Hierarchy panel or directly on the skeleton.
To select multiple nodes the user can press the Ctrl or Shift key.
Ctrl key will select multiple individual nodes and Shift key will select every node between the first selection and second selection.

Ctrl key will select multiple individual nodes

Shift key will select every node between the first selection and second selection.
Shift key selection on the hierarchy will follow the hierarchy, if used directly on the skeleton it will follow a path tracing algorithm.

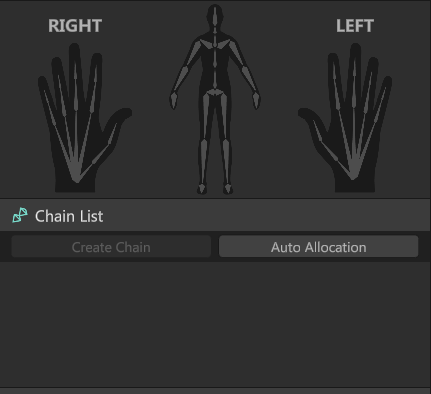
Creating Chains/Adding Bones
The whole purpose of MANUS Dev Tools is to define and configure chains so the skeleton can be properly animated.
Chains are collections of bones that have a relation to each other. For instance, the upper and lower leg bones form the leg chain. And all the bones that make up the spine together make the spine chain.
Automatic Allocation
There are two ways to setup your skeleton. Manually assign all bones to chains until you have a full skeleton, or let the automatic allocation take care of it.
Here MANUS Core will attempt to assign the chains. After loading the model into the Dev Tools click Auto Allocation to start the process. Important notes are to make sure to properly set the Skeleton type before sending your model to the Dev Tools (Hands / Body / Both).
Verify successful allocation using the animation system. If the bones animate correctly the allocation was likely successful.
Manual creation
To create a chain manually, the following steps must be followed:
1. Select the desired nodes to be included in the new chain.
2. Click the button “Create Chain”.
3. Select a Type and Side.
4. Configure the Chain settings by setting the values in the displayed form.


Adding Bones
Nodes can also be added to the existing chains, the following steps must be followed:
1. Select the existing chain where nodes should be added.
2. Select the desired nodes to add to the chain.
3. Click the “Add Bones” button.


Chain Settings
Each chain type has a varying range of settings that can be configured. To do that simply select any chain and edit corresponding settings shown in the bottom form.
The user can also change the type and side of chain. Changing the type will change the settings form presented in the bottom.


Undo/Redo
All operations (excluding loading and saving a skeleton) can be undone or redone by pressing the key combination Ctrl + Z (Undo) or Ctrl + Y (Redo).
Preview Animation (ver. 2.1)
Starting on version 2.1, the user can preview pre-recorded animations and validate the result of the chains configuration.


Progress Panel
The progress panel shows a global view of the configuration progress.
A completely empty skeleton will display every segment in dark gray.
A skeleton with only empty chains (no nodes added) will be highlighted with a lighter gray.

If the chains contain the minimum required number of nodes to be considered “valid” the segments will be highlighted with green.


Saving a Skeleton
Once the skeleton configuration is finished (or at any time), the user has 2 options to save his work.
1. Send to Plugin: This will save the skeleton on the Core so it can be loaded back in the plugin that was used to send the skeleton to Manus DevTools.
2. Export to File: This will save the skeleton into the local file system using the .mskl file format, this file can be later loaded back into Manus DevTools or directly into the plugin.
